A Guestbook Module
Note
The source code for this sample module can be found on Github: https://github.com/donker/dnn-sample-guestbook
Let's take a non-trivial example to build a module. We're going to build a guestbook module. The module allows users to leave a message and these messages will be displayed in a list that is sorted by the date they were added in reverse order. There is a setting in the module specifying whether we wish to use moderation. If not then all messages are displayed as they come in. If we use moderation than anyone with edit permissions on the module will need to click on a button to OK any incoming message before it's shown. Finally: users can edit their own messages until they've been moderated and any user with edit permissions can edit any message. If a message has been edited it will be displayed with a small note who edited the message and when.
The tools I'm using are:
- Visual Studio 2013
- Community Build Tasks
- Christopher Hammond's DNN Module Templates
- DNN 7.3.4
Module Templates and Build Tasks
As you'll quickly discover making DNN modules involves a number of repetitive tasks. We wouldn't be software engineers if we didn't come up with a way to automate this. Two things I recommend right from the start are to use a Visual Studio project template and to install the community build tasks. Both are products of individual members of the DNN community. There is no official release of these by DNN Corp and there are several competing versions of both. For this demo I used Christopher Hammond's module template as he has a long track record in this. It is certainly a great template to begin with. Another one is Bitboxx's DNN 7 module template which focuses on using the new DAL and includes t4 templates to generate code from the database. Once you're familiar with module programming I urge you to explore and adapt a template to suit your own needs. Editing templates for Visual Studio is fairly trivial and quite quickly you'll find yourself wanting to tweak them. In our example I've already edited Chris' template to use WROX as company name, for instance.
Most templates rely on community build tasks being installed. Build tasks are MSBuild instructions that a project can leverage during the build process. Specifically for DNN it is useful to automate the creation of a module package. This is why these tasks have become quite popular by DNN module developers. Again there are competing products out there. The oldest is maintained by Vicenç Masanas and is called "MSBuild DotNetNuke Tasks". I have those installed. But there is a newer project called "MS Build for DNN module development" maintained by Ernst-Peter Tamminga. They are both respected long serving members of the DNN community so I'm not going to push one or the other on you.
Creating The Project
I assume you've already installed a DNN install version and you've installed the tasks and module template.
Startup Visual Studio and select "New Project…".
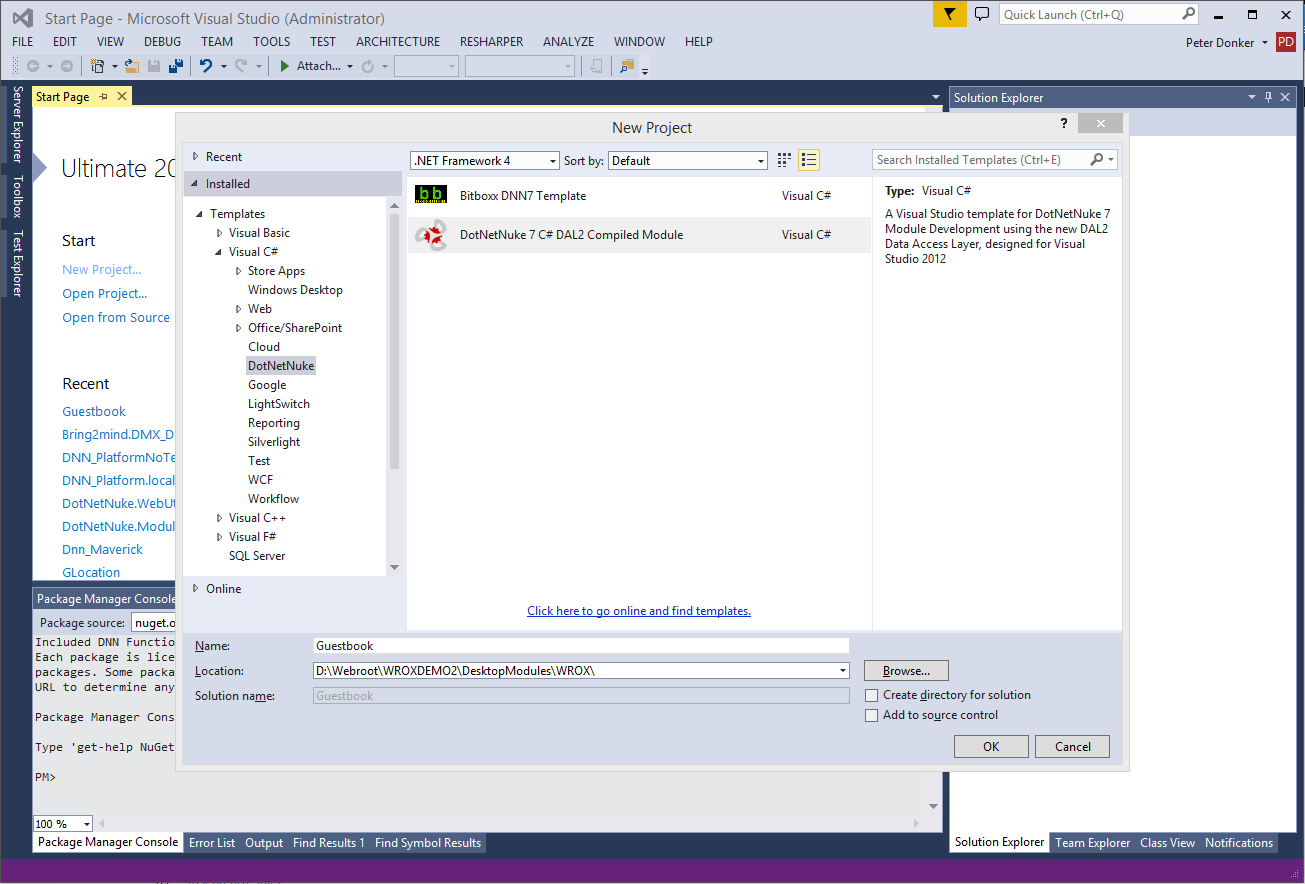
Select the "DotNetNuke 7 C# DAL2 Compiled Module" template from the Visual C#/DotNetNuke folder and set the name to "Guestbook" and the folder path to wherever your DNN installation is and then "DesktopModules\WROX". Make sure to uncheck "Create directory for solution" before you click OK (fig. 13).
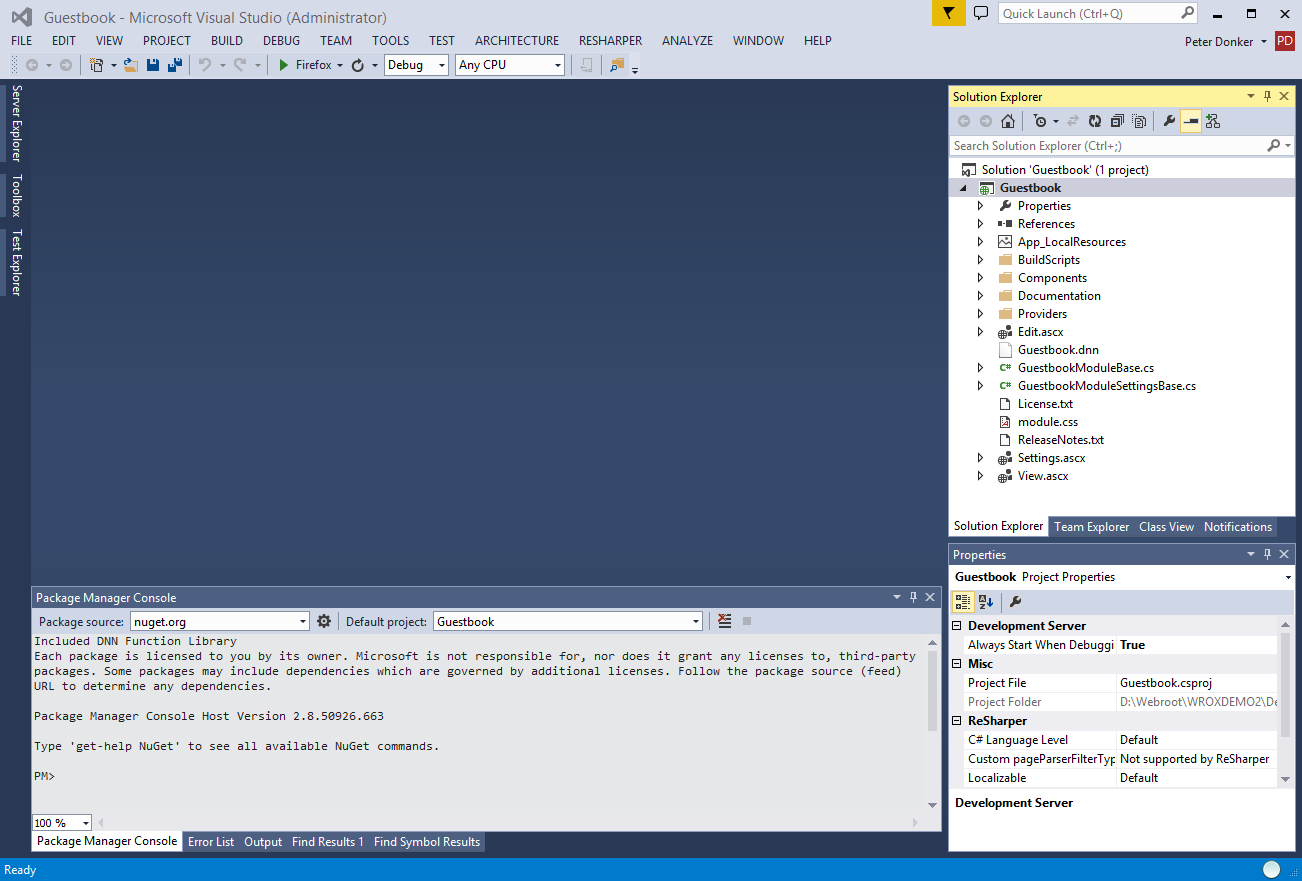
You should now see the new project loaded in your Visual Studio (fig. 14).
Right click "References" and browse to add references to DotNetNuke.dll and DotNetNuke.WebUtility.dll from the bin folder of the site you're developing in. The list of references should now no longer show any errors.
Now go ahead and open up Guestbook.dnn. This is the module manifest. The manifest needs to be packed with a module when you distribute it and it tells DNN how to load the module. We'll look more in depth into the manifest in the next section. For now we're going to edit the manifest so we can initialize our module in DNN. We'll be focusing our attention to the segment that starts with
<component type="Module">Edit or verify the manifest so the following lines are as they are here:
<foldername>WROX\Guestbook</foldername>
…
<controlSrc>DesktopModules/WROX/Guestbook/View.ascx</controlSrc>
…
<controlSrc>DesktopModules/WROX/Guestbook/Edit.ascx</controlSrc>
…
<controlSrc>DesktopModules/WROX/Guestbook/Settings.ascx</controlSrc>
Now fire up your dev site, log in as host and go to the Extensions page.
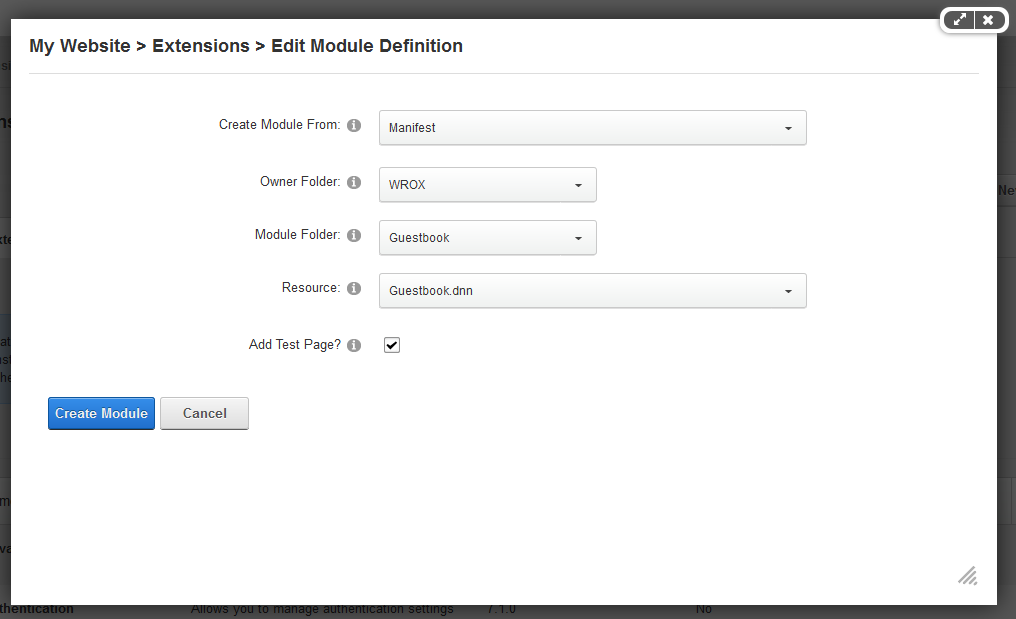
Click "Create New Module" and select to create the module from a Manifest. Select the right folder name (WROX) and module folder (Guestbook). In the resource dropdown we should now see our dnn file that we just edited. Select "Add Test Page" and click to create the module (fig. 15).
You are now redirected to the test page and you'll see a big error. That is because we haven't actually coded anything yet. All we've done is create a new module definition in DNN using the controls listed in the manifest. Our files are still filled with boilerplate stuff and there is no dll in the bin folder with our code. For now you can close the browser as we will flesh out the module.
The Data Layer - SQL
It's time we thought about what it is we're going to be storing. Foremost we'll be storing a text message left by visitors. We'll call the object a guestbook entry. The entry will have message as field as well as a date time stamp when it was created and a link to the users table in DNN to store who it was that left the message. We'll also need to bring in scope meaning we need to record the module id in which the entry was created. This avoids the message cropping up in another module if the user adds multiple guestbook modules to their site. Finally we'll need a flag to tell us whether the message has been approved. The SQL to create this is as follows:
LISTING 3: SQL script to create entries table
CREATE TABLE {databaseOwner}{objectQualifier}WROX_Guestbook_Entries(
 [EntryId] [int] IDENTITY(1,1) NOT NULL,
 [ModuleId] [int] NOT NULL,
 [Message] [nvarchar](max) NOT NULL,
 [Approved] [bit] NULL,
 [CreatedByUserID] [int] NULL,
 [CreatedOnDate] [datetime] NULL,
 [LastModifiedByUserID] [int] NULL,
 [LastModifiedOnDate] [datetime] NULL,
 CONSTRAINT PK_{objectQualifier}WROX_Guestbook_Entries PRIMARY KEY CLUSTERED
(
 [EntryId] ASC
)WITH (STATISTICS_NORECOMPUTE = OFF, IGNORE_DUP_KEY = OFF)
)
GO

ALTER TABLE {databaseOwner}{objectQualifier}WROX_Guestbook_Entries  WITH CHECK ADD  CONSTRAINT FK_{objectQualifier}WROX_Guestbook_Entries_Modules FOREIGN KEY([ModuleId])
REFERENCES {databaseOwner}{objectQualifier}Modules ([ModuleID])
ON DELETE CASCADE
GO
You'll notice I've used two tokens that are specific to DNN and will throw errors if you try to run this as is in SQL management studio. If you run the above in the SQL module (Host menu) then it will work just fine. If you want to run it directly in SQL Mgt Studio then the {databaseOwner} should be replaced with "dbo." Most likely (the default db owner) and {objectQualifier} with nothing as by default DNN does not add this. The object qualifier is a remnant of DNN's long history and will be discussed later in this book.
Another thing you'll notice is that I've prefixed our table with "WROX_Guestbook_". It is good practice to prefix your SQL objects with a unique string so there is little chance of it colliding with another third party module. Every module adds its data to SQL and it all has to live peacefully side-by-side. So a little precaution in naming items comes in handy.
Finally you'll see I've added the standard audit columns to the table (Created/LastModified). You'll find these in many places in DNN's data layer and I find it good practice to stick to conventions when they correspond to your situation. Here we'll keep record of who created the message and the last one to have modified it (remember we'll have an option to edit the message).
We'll also create a view to correspond to our table which brings in the display names of the creator and modifier of an entry. This view is created as follows:
LISTING 4: SQL script to create entries view
CREATE VIEW {databaseOwner}{objectQualifier}vw_WROX_Guestbook_Entries
AS
SELECT
 e.*,
 ISNULL(uc.DisplayName, 'Unknown') AS CreatedByUserDisplayName,
 ISNULL(um.DisplayName, 'Unknown') AS LastModifiedByUserDisplayName
FROM {databaseOwner}{objectQualifier}WROX_Guestbook_Entries e
 LEFT JOIN {databaseOwner}{objectQualifier}Users uc ON e.CreatedByUserID = uc.UserID
 LEFT JOIN {databaseOwner}{objectQualifier}Users um ON e.LastModifiedByUserID = um.UserID
GO
As you can see we're doing a left joins for these users as we can imagine a scenario where this is an anonymous post in which case we'll just use the name "Unknown" for that user.
This is all we'll be doing in SQL Server. We now have a table and a view for our data. We can now turn to Visual Studio and code up our module.
The Data Layer - DAL 2
Let's glue the SQL to code using a DAL 2 approach. We'll begin by deleting stuff we don't need from our newly created module. So delete all files in the Components folder and you can delete the entire Documentation folder as well. Now add a new file to the Components folder called EntryInfo.cs. The EntryInfo object will be what is mapped to our table. We annotate the class to give it meaning in DAL2 as follows:
LISTING 5: EntryInfo.cs
using System;
using DotNetNuke.ComponentModel.DataAnnotations;

namespace WROX.Modules.Guestbook.Components
{
	[Scope("ModuleId")]
	[TableName("WROX_Guestbook_Entries")]
	[PrimaryKey("EntryId")]
	public class EntryInfo
	{
		public int EntryId { get; set; }
		public int ModuleId { get; set; }
		public string Message { get; set; }
		public bool Approved { get; set; }
		public int CreatedByUserID { get; set; }
		public DateTime CreatedOnDate { get; set; }
		public int LastModifiedByUserID { get; set; }
		public DateTime LastModifiedOnDate { get; set; }

	}
}
Most of the above will be self-explanatory. The scope attribute tells DAL 2 that we'll be passing in ModuleId to limit what we access.
Next we'll add the controller class that will do our CRUD operations. Create a file called EntryController.cs in the same folder as follows:
LISTING 6: EntryController.cs
using System;
using System.Collections.Generic;
using System.Linq;
using DotNetNuke.Data;

namespace WROX.Modules.Guestbook.Components
{
	public class EntryController
	{
		public static void AddEntry(EntryInfo entry, int userId)
		{
			entry.CreatedByUserID = userId;
			entry.CreatedOnDate = DateTime.Now;
			entry.LastModifiedByUserID = userId;
			entry.LastModifiedOnDate = DateTime.Now;
			using (IDataContext ctx = DataContext.Instance())
			{
				var rep = ctx.GetRepository<EntryInfo>();
				rep.Insert(entry);
			}
		}

		public static EntryInfo GetEntry(int entryId, int moduleId)
		{
			EntryInfo entry;
			using (IDataContext ctx = DataContext.Instance())
			{
				var rep = ctx.GetRepository<EntryInfo>();
				entry = rep.GetById(entryId, moduleId);
			}
			return entry;
		}

		public static void UpdateEntry(EntryInfo entry, int userId)
		{
			entry.LastModifiedByUserID = userId;
			entry.LastModifiedOnDate = DateTime.Now;
			using (IDataContext ctx = DataContext.Instance())
			{
				var rep = ctx.GetRepository<EntryInfo>();
				rep.Update(entry);
			}
		}

		public static void DeleteEntry(EntryInfo entry)
		{
			using (IDataContext ctx = DataContext.Instance())
			{
				var rep = ctx.GetRepository<EntryInfo>();
				rep.Delete(entry);
			}
		}
	}
}
A more in depth discussion of DAL 2 is the subject of another chapter. As you can see there is not much to it to code the CRUD operations. I've added a bit of logic to do the handling of the audit fields in these methods. Otherwise it'd be even terser.
We'll now add an object to hold the view. It is the same as the EntryInfo above but with the display names of the creating and modifying users. We'll call it EntryViewInfo.cs:
LISTING 7: EntryViewInfo.cs
using DotNetNuke.ComponentModel.DataAnnotations;

namespace WROX.Modules.Guestbook.Components
{
	[Scope("ModuleId")]
	[TableName("vw_WROX_Guestbook_Entries")]
	public class EntryViewInfo : EntryInfo
	{
		public string CreatedByUserDisplayName { get; set; }
		public string LastModifiedByUserDisplayName { get; set; }
	}
}
We can now add the method to retrieve these from the database in the EntryController:
public static IEnumerable<EntryViewInfo> GetEntries(int moduleId, bool includeNonApproved)
	{
		IEnumerable<EntryViewInfo> entries;

		using (IDataContext ctx = DataContext.Instance())
		{
			var rep = ctx.GetRepository<EntryViewInfo>();
			entries = rep.Get(moduleId);
		}
		if (!includeNonApproved)
		{
			entries = entries.Where(e => e.Approved);
		}

		return entries.OrderByDescending(e => e.CreatedOnDate);
	}
Finally we'll need a method to flag an entry as approved without setting the LastModified user to whoever approves the message. We also add this to the controller:
public static void Approve(EntryInfo entry)
	{
		entry.Approved = true;
		using (IDataContext ctx = DataContext.Instance())
		{
			var rep = ctx.GetRepository<EntryInfo>();
			rep.Update(entry);
		}
	}
This concludes the code we need to store and retrieve our data. We're now going to code the settings for the module.
Settings
Most applications need to allow administrators to manage some parameters. In our example I have included settings as this is so common and so important to do right. We have just one setting: whether we should have an approval mechanism or not. We'll call the setting AutoApprove internally. It's a Boolean that, when true, causes any added message (you guessed it) to be automatically approved. We need to solve the following parts:
- Persist this setting somewhere
- Show the administrator a screen with a checkbox and some explanation
- Make sure the setting is available throughout the UI code
To start with the first: there is a table in DNN that is meant just for this purpose: ModuleSettings. It is a table with name/value pairs bound to a module's ID. So our module needs to serialize any setting to the (string) value field and deserialize it when reading back the value. To avoid this bleeding into various classes of your module, I refer to abstract of this into a single settings class. Or our module this class will look like this:
LISTING 8: GuestbookSettings.cs
using System.Collections;
using DotNetNuke.Collections;
using DotNetNuke.Entities.Modules;
using DotNetNuke.Common.Utilities;

namespace WROX.Modules.Guestbook.Components
{
	public class GuestbookSettings
	{
		private int ModuleId { get; set; }
		private Hashtable AllSettings { get; set; }

		public bool AutoApprove { get; set; }

		public GuestbookSettings(int moduleId)
		{
			ModuleId = moduleId;
			AllSettings = (new ModuleController()).GetModuleSettings(moduleId);
			AutoApprove = AllSettings.GetValueOrDefault("AutoApprove", false);
		}

		public static GuestbookSettings GetGuestbookSettings(int moduleId)
		{
			var cacheKey = "ModuleSettings" + moduleId;
			var settings = (GuestbookSettings)DataCache.GetCache(cacheKey);
			if (settings == null)
			{
				settings = new GuestbookSettings(moduleId);
				DataCache.SetCache(cacheKey, settings);
			}
			return settings;
		}

		public void SaveSettings()
		{
			var objModules = new ModuleController();
			objModules.UpdateModuleSetting(ModuleId, "AutoApprove", AutoApprove.ToString());
			var cacheKey = "ModuleSettings" + ModuleId;
			DataCache.SetCache(cacheKey, this);
		}

	}

}
The constructor reads all the module's settings into a hashtable. It then parses out our AutoApprove setting from this using an extension method included in DNN. If the value is not present or it can't be converted to a Boolean it will be set to false. This takes care of the new module scenarios where a user has just added a module and there are no settings yet.
The static method to create the settings object does an important thing besides calling the constructor: it handles caching. This means that every time the settings are called they are not being retrieved and reparsed over and over again. Finally the SaveSettings writes the settings to DNN's ModuleSettings table and resets the cache.
It may seem a bit of an overkill for just a single Boolean, but obviously in more complex modules you're going to have many values that need to be stored and using the above approach keeps all your logic for this in one place.
Now we need to make this available to our UI. You may have noticed two classes in the root folder of our module called GuestbookModuleBase.cs and GuestbookModuleSettingsBase.cs. These were created by our template. If you were using another method to create the module you may need to add these yourself. I consider it good practice to use a class that underlies all your UI controls where you can handle settings and other shared properties. Commonly you'll find two inheritance chains in a module: PortalModuleBase and ModuleSettingsBase. The former is used for any control that loads to represent your module on the DNN page. The latter is used for a control you use for settings management. You can use this to hook into the module settings screen where it will be shown as a tab. This makes for a very consistent user experience. What the GuestbookModuleBase and GuestbookModuleSettingsBase do is to inherit from these so our module's controls can inherit from them. You can clear out any code that was previously there and add to each of them:
public new GuestbookSettings Settings
		{
			get
			{
				return GuestbookSettings.GetGuestbookSettings(ModuleId);
			}
		}
We need the new keyword here because we're shadowing Settings from the base class which is the hashtable straight from ModuleSettings that we've now encapsulated into our own settings class. You can now access our setting by using Settings.AutoApprove at any place in our control code.
So let's begin by making the settings control that will be loaded in our module. In the manifest of our module that we loaded into DNN we specified that one control (Settings.ascx) had a control key of "Settings". This is a special case which tells DNN should attempt to load this control into the module settings screen under its own tab.
You can open up Settings.ascx and replace whatever is there with the following:
LISTING 9: Settings.ascx
<%@ Control Language="C#" AutoEventWireup="true" CodeBehind="Settings.ascx.cs" Inherits="WROX.Modules.Guestbook.Settings" %>
<%@ Register TagName="label" TagPrefix="dnn" Src="~/controls/labelcontrol.ascx" %>

<fieldset>
 <div class="dnnFormItem">
  <dnn:Label ID="lblAutoApprove" runat="server" ResourceKey="lblAutoApprove" ControlName="chkAutoApprove" />
  <asp:CheckBox runat="server" ID="chkAutoApprove" />
 </div>
</fieldset>
As you can see we're using a dnn:Label control here which will be placed before the checkbox and displays not just a (meaningful) caption but also a help icon which pops up a help text when clicked. This has all been taken care of for you. All you need to do is to add the value in the ResourceKey attribute to the Settings.ascx.resx file (fig. 16) in the correct way. In our example we need to add lblAutoApprove.Text and lblAutoApprove.Help as follows:
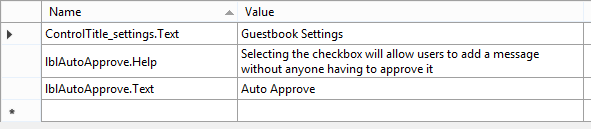
You'll also notice the ControlTitle_settings.Text. This is used for our title of the tab in the module settings screen. Now open up the code behind for the settings.ascx. There are two methods to override in this control: LoadSettings and SaveSettings. These are called by DNN when it uses this control. Given that we're inheriting from the GuestbookModuleSettingsBase our code is fairly simple here:
LISTING 10: Settings.ascx.cs
using System;
using DotNetNuke.Services.Exceptions;

namespace WROX.Modules.Guestbook
{
	public partial class Settings : GuestbookModuleSettingsBase
	{
		#region Base Method Implementations

		public override void LoadSettings()
		{
			try
			{
				if (Page.IsPostBack == false)
				{
					chkAutoApprove.Checked = Settings.AutoApprove;
				}
			}
			catch (Exception exc) //Module failed to load
			{
				Exceptions.ProcessModuleLoadException(this, exc);
			}
		}

		public override void UpdateSettings()
		{
			try
			{
				Settings.AutoApprove = chkAutoApprove.Checked;
				Settings.SaveSettings();
			}
			catch (Exception exc) //Module failed to load
			{
				Exceptions.ProcessModuleLoadException(this, exc);
			}
		}

		#endregion
	}
}
This completes the work to implement our settings. Administrators can now manage settings in the module's settings panel and this is persisted to all controls throughout the module. We'll now move to the UI for our module.
The UI
Regular users will only see two controls you'll create: View.ascx and Edit.ascx. View is the default control that is loaded whenever the user comes to the page (it has no control key in the definition). Edit is where we'll allow the user to either create or edit a message. It has the control key "Edit".
There are two properties that we'll need to refer to regularly: the currently selected EntryId and whether the user is allowed to edit other people's messages. Abstracting these two properties into our base class allows us to isolate that logic and save on the amount of code we'll be adding in both the view and edit controls.
To determine the EntryId we examine the query string. We can do this as follows in GuestbookModuleBase:
protected override void OnInit(EventArgs e)
		{
			_entryId = Request.Params.GetValueOrDefault("EntryId", -1);
		}

		private int _entryId;
		public int EntryId
		{
			get
			{
				return _entryId;
			}

		}
Whether the user has edit permissions is determined by the ModulePermissionController depending on the module's permissions collection:
public bool CanEdit
		{
			get
			{
				return ModulePermissionController.HasModulePermission(ModuleConfiguration.ModulePermissions, "EDIT");
			}
		}
We now have these two properties at our fingertips when writing out the View and Edit controls. The View control will have a repeater to show the messages and an "Add" button users can click to create a new message. It will look like this:
LISTING 11: View.ascx
<%@ Control Language="C#" AutoEventWireup="true" CodeBehind="View.ascx.cs" Inherits="WROX.Modules.Guestbook.View" %>
<%@ Import Namespace="WROX.Modules.Guestbook.Components" %>

<div>
 <asp:Repeater runat="server" ID="rpGuestbook" OnItemDataBound="rpGuestbook_ItemDataBound" OnItemCommand="rpGuestbook_ItemCommand">
  <ItemTemplate>
   <div class="row-fluid messageRow">
    <div class="span3">
     <h3>
      <%# Eval("CreatedByUserDisplayName") %>
     </h3>
     <p><%# ((DateTime)Eval("CreatedOnDate")).ToString("D") %></p>
    </div>
    <div class="span9 message">
     <div>
      <%# Eval("Message") %>
     </div>
     <div class="messageButtons">
      <asp:HyperLink ID="cmdEdit" runat="server" ResourceKey="cmdEdit" Visible="false" Enabled="false" CssClass="btnMessage" />
      <asp:LinkButton ID="cmdApprove" runat="server" ResourceKey="cmdApprove" Visible="false" Enabled="false" CommandName="Approve" CssClass="btnMessage" />
      <asp:LinkButton ID="cmdDelete" runat="server" ResourceKey="cmdDelete" Visible="false" Enabled="false" CommandName="Delete" CssClass="btnMessage" />
     </div>
    </div>
    <div class="editNote" style="display:<%#((DateTime)Eval("CreatedOnDate") == (DateTime)Eval("LastModifiedOnDate") ? "none" : "block") %>">
     <%# EditString((EntryViewInfo)Container.DataItem) %>
    </div>
   </div>
  </ItemTemplate>
 </asp:Repeater>
</div>

<asp:LinkButton runat="server" ID="cmdAdd" OnClick="cmdAdd_Click" ResourceKey="cmdAdd" CssClass="dnnPrimaryAction" />
As we're using the default DNN 7 skin for our example we can use the Bootstrap 2 classes that are loaded. In a real world scenario you might need to either design it for a specific skin, or create all of your css to include in the module. This is not trivial and practice will tell you how best to approach this.
You'll notice we have 3 buttons defined for each message row. The visibility and events for these buttons will be handled by the code behind of this control:
LISTING 12: View.ascx.cs
using System;
using System.Web.UI.WebControls;
using WROX.Modules.Guestbook.Components;
using DotNetNuke.Services.Exceptions;
using DotNetNuke.Services.Localization;
using DotNetNuke.UI.Utilities;

namespace WROX.Modules.Guestbook
{
	public partial class View : GuestbookModuleBase
	{
		protected void Page_Load(object sender, EventArgs e)
		{
			try
			{
				var showAll = Settings.AutoApprove;
				if (!showAll)
				{
					showAll = CanEdit;
				}
				rpGuestbook.DataSource = EntryController.GetEntries(ModuleId, showAll);
				rpGuestbook.DataBind();
			}
			catch (Exception exc) //Module failed to load
			{
				Exceptions.ProcessModuleLoadException(this, exc);
			}
		}

		protected void cmdAdd_Click(object sender, EventArgs e)
		{
			Response.Redirect(EditUrl("Edit"));
		}

		protected void rpGuestbook_ItemDataBound(object sender, RepeaterItemEventArgs e)
		{
			if (e.Item.ItemType == ListItemType.AlternatingItem || e.Item.ItemType == ListItemType.Item)
			{
				var cmdEdit = e.Item.FindControl("cmdEdit") as HyperLink;
				var cmdDelete = e.Item.FindControl("cmdDelete") as LinkButton;
				var cmdApprove = e.Item.FindControl("cmdApprove") as LinkButton;

				var entry = (EntryViewInfo)e.Item.DataItem;

				if (cmdDelete != null && cmdApprove != null && cmdEdit != null)
				{
					cmdDelete.CommandArgument = entry.EntryId.ToString();
					cmdApprove.CommandArgument = entry.EntryId.ToString();
					cmdEdit.NavigateUrl = EditUrl(string.Empty, string.Empty, "Edit", "EntryId=" + entry.EntryId);
					ClientAPI.AddButtonConfirm(cmdDelete, Localization.GetString("ConfirmDelete", LocalResourceFile));
					cmdApprove.Enabled = cmdApprove.Visible = !Settings.AutoApprove && !entry.Approved && CanEdit;
					if (Settings.AutoApprove)
					{
						cmdDelete.Enabled = cmdDelete.Visible = cmdEdit.Enabled = cmdEdit.Visible = (CanEdit || (entry.CreatedByUserID == UserId && UserId != -1));
					}
					else
					{
						cmdDelete.Enabled = cmdDelete.Visible = cmdEdit.Enabled = cmdEdit.Visible = CanEdit;
					}
				}
			}
		}

		protected void rpGuestbook_ItemCommand(object source, RepeaterCommandEventArgs e)
		{
			if (e.CommandName == "Delete")
			{
				var entry = EntryController.GetEntry(Convert.ToInt32(e.CommandArgument), ModuleId);
				if (entry != null)
				{
					EntryController.DeleteEntry(entry);
				}
			}
			if (e.CommandName == "Approve")
			{
				var entry = EntryController.GetEntry(Convert.ToInt32(e.CommandArgument), ModuleId);
				if (entry != null)
				{
					EntryController.Approve(entry);
				}
			}
			Response.Redirect(DotNetNuke.Common.Globals.NavigateURL());
		}

		public string EditString(EntryViewInfo entry)
		{
			return string.Format(LocalizeString("Edited"), entry.LastModifiedByUserDisplayName, entry.LastModifiedOnDate);
		}

	}
}
Note the use of EditUrl in the logic to create the edit link and the handler of the add command. EditUrl is a DNN function that constructs a url that will load the edit screen. Optionally it can receive parameters that allows the edit screen to determine if it is editing an existing entry or creating a new one. In our example we use "EntryId=X" for this, where X is the Entry ID of the entry. If it's omitted we assume it is a new entry we should be creating.
Now let's create the edit screen. The edit screen should have a text box (we could be using an HTML editor but for our example I will restrict it to text only), a submit and a cancel button.
LISTING 13: Edit.ascx
<%@ Control Language="C#" AutoEventWireup="true" CodeBehind="Edit.ascx.cs" Inherits="WROX.Modules.Guestbook.Edit" %>
<h3>
 <asp:Label runat="server" ID="lblMessage" ResourceKey="lblMessage" />
</h3>
<div>
 <asp:TextBox ID="txtMessage" runat="server" TextMode="MultiLine" Rows="5" Width="50%" />
</div>
<div runat="server" id="divApproveWarning" class="dnnFormMessage dnnFormWarning">
 <asp:label runat="server" ID="lblApproveWarning" ResourceKey="lblApproveWarning" />
</div>
<p>
 <asp:LinkButton ID="btnSubmit" runat="server" OnClick="btnSubmit_Click" resourcekey="btnSubmit" CssClass="dnnPrimaryAction" />
 <asp:LinkButton ID="btnCancel" runat="server" OnClick="btnCancel_Click" resourcekey="btnCancel" CssClass="dnnSecondaryAction" />
</p>
Note we're adding a message that we can switch on or off to tell the user that a new message needs to be approved to be visible.
LISTING 14: Edit.ascx.cs
using System;
using DotNetNuke.Entities.Users;
using DotNetNuke.Security;
using WROX.Modules.Guestbook.Components;
using DotNetNuke.Services.Exceptions;

namespace WROX.Modules.Guestbook
{
	public partial class Edit : GuestbookModuleBase
	{
		protected void Page_Load(object sender, EventArgs e)
		{
			try
			{
				if (!Page.IsPostBack)
				{
					if (EntryId > 0)
					{
						if (UserId == -1)
						{
							throw new Exception("Anonymous users cannot edit messages");
						}
						var entry = EntryController.GetEntry(EntryId, ModuleId);
						if (!CanEdit)
						{
							if (entry.CreatedByUserID != UserId)
							{
								throw new Exception("You cannot edit someone else's message");
							}
						}
						txtMessage.Text = entry.Message;
					}
					divApproveWarning.Visible = !Settings.AutoApprove;
				}
			}
			catch (Exception exc) //Module failed to load
			{
				Exceptions.ProcessModuleLoadException(this, exc);
			}
		}


		protected void btnSubmit_Click(object sender, EventArgs e)
		{
			var entry = new EntryInfo();
			if (EntryId > 0)
			{
				if (UserId == -1)
				{
					throw new Exception("Anonymous users cannot edit messages");
				}
				entry = EntryController.GetEntry(EntryId, ModuleId);
				if (!CanEdit)
				{
					if (entry.CreatedByUserID != UserId)
					{
						throw new Exception("You cannot edit someone else's message");
					}
				}
			}
			else
			{
				entry.Approved = Settings.AutoApprove;
				entry.ModuleId = ModuleId;
			}

			entry.Message = (new PortalSecurity()).InputFilter(txtMessage.Text, PortalSecurity.FilterFlag.NoMarkup | PortalSecurity.FilterFlag.NoSQL | PortalSecurity.FilterFlag.NoScripting | PortalSecurity.FilterFlag.NoAngleBrackets);

			if (EntryId > 0)
			{
				EntryController.UpdateEntry(entry, UserId);
			}
			else
			{
				EntryController.AddEntry(entry, UserId);
			}
			Response.Redirect(DotNetNuke.Common.Globals.NavigateURL());
		}

		protected void btnCancel_Click(object sender, EventArgs e)
		{
			Response.Redirect(DotNetNuke.Common.Globals.NavigateURL());
		}
	}
}
Note that quite a bit of code is devoted to security. First, in both the page load and in the handler for the submit button we do a number of checks to see if the user is allowed to edit an existing message. Even though in regular use the user could never get here (the edit button wouldn't be shown in the view control) the application is steered through the query string and it would be trivial for someone with knowledge of DNN to construct an edit link that would load the message. Always assume that a hacker will know how to create a url that you depend on. And that they are using tools like Fiddler to create requests that resemble what you'd expect from a regular user. The one thing you can rely on is that DNN did its work authenticating the user.
Secondly you'll notice we are passing whatever is added through the message box through PortalSecurity.InputFilter. This method allows us to strip various bits from the input that may be leveraged by hackers or spammers to wreak havoc. So we're not allowing any SQL (SQL injection attacks), nor Javascript or even markup. The latter is also to prevent users accidentally messing up the look of our page. But markup could be used by spammers to show links to other sites.
Finally, we'll add some css to module.css to make the result look acceptable. The module's css is loaded after the framework's default css but before the css that comes with the skin. That way, a designer can override specific module's css classes for a particular skin. You'll learn more about DNN's cascading model in the chapter on skinning. Here is the css I've used for our sample module:
LISTING 15: Module.css
.messageRow {
 border: 1px solid #ddd;
 border-width: 0 0 1px 0;
 margin-bottom: 20px;
}
.editNote {
 font-size: 75%;
 color: #999;
 width: 100%;
 text-align: right;
 line-height: 1.5em;
}
.message {
 padding-bottom: 10px;
}
.btnMessage {
 padding: 2px 6px 2px 6px;
 margin-right: 6px;
 border-radius: 4px;
 border: 1px solid #ddd;
 background-color: #fff;
}
.btnMessage:hover {
 background-color: #ddd;
}
.messageButtons {
 padding-top: 10px;
}
Results
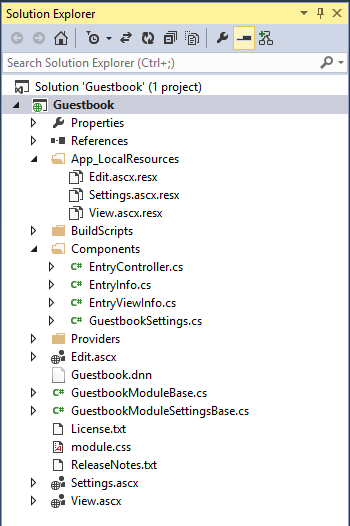
We are now ready to run our module. Your solution should look something like figure 17. You can compile what you have and make sure that the dll is written to the bin folder of your dev site. You may notice a delay in the loading of the site as ASP.NET reloads all the dlls of the site and recycles the app pool. Every time you build to the bin folder the site completely refreshes, empties all caches and starts loading from scratch.
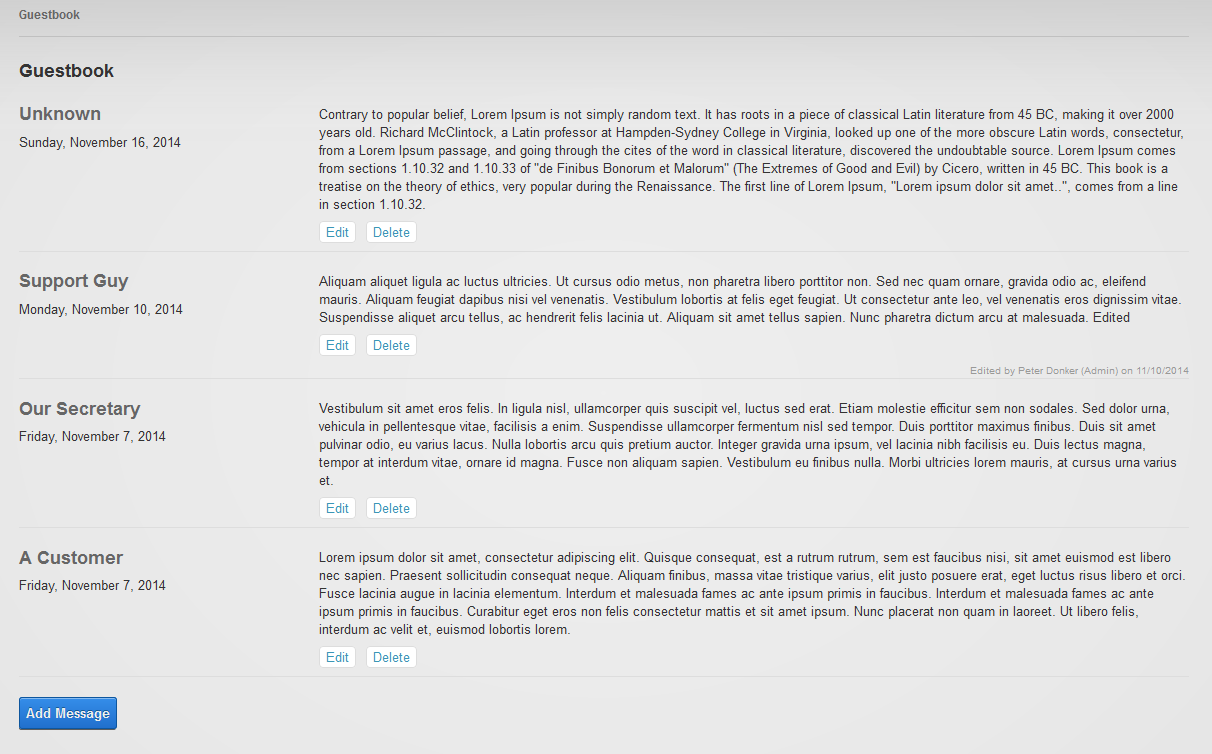
You should see your module page with an add button. Add some messages to verify its operation (fig. 18).
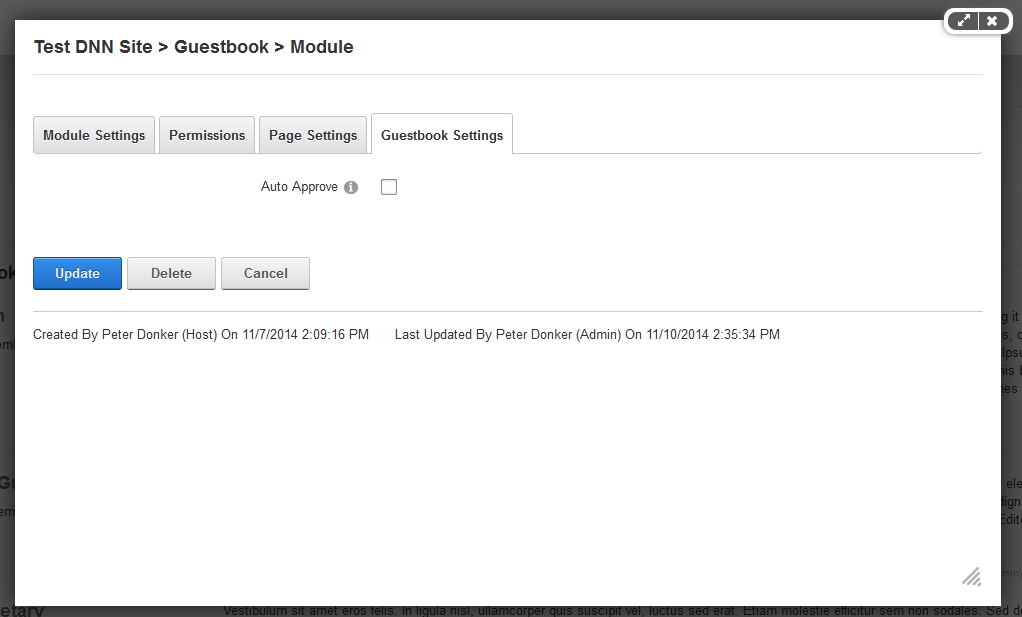
Now switch to edit mode and use the module's menu to pop up the settings. You'll notice a fourth tab called "Guestbook Settings" with our checkbox (fig. 19).
Note
This is an extract from the Wrox book Professional DNN 7 by Shaun Walker et al. Copyright remains with P.A. Donker and Wiley Publishers.